
Linux Tutorial
7 Basic Linux Commands to Manage a File System.
1. cd [change directory]
cd is the "change directory" command, used for changing the current working directory that you are in. A directory is essentially like a folder, which may contain files and other directories. Your current working directory is the "folder" in which you are currently in.
To use the cd command, type on the terminal cd and then the path of the directory you want to change into, in this format: cd directorypath. It is important to put a space between the command and the argument passed into it.
The following are some common cd commands:
cd /: this command takes changes you into the root directory--the first file directory in your filesystem hierarchy.cd /directory1/directory2/directory3: This commands takes you inside a subdirectory in another directory.- For example:
cd /home/student/Documents/would take you to the Documents directory inside the student directory - If you are already in a directory and want to travel into a subdirectory, you would not have to provide the full path to that directory. Instead, you can provide the relative path
- If there was a subdirectory called Projects in the Documents directory you were already in, you would only need to type 'cd Projects' to change into that directory.
- For example:
- The
cd ~andcdcommands take you to your home directory, no matter what your current working directory is. cd ..changes you into the parent directory--that is the directoy one level up from the directory you are in.- From the previous example, if your current working directory is Projects, then typing
cd ..would take you back to the Documents directory.
- From the previous example, if your current working directory is Projects, then typing
.png)
2. pwd [print working directory]
pwd is the "print working directory" command, used for display the current directory the user is in. It is a useful command when unsure of the directory you are in or to view the full path of your directory. To use it, simply type pwd on the command line and it will display the full path of your current directory.
- To see all the files inside your working directory, you can use the
lscommand or thels -lcommand. Thelscommand is the list command and shows you a list of all the files in the working directory. Thels -lcommand is the long list command, showing you the same information aslsbut formatted differently.
3. mkdir [make directoy]
mkdir is the "make directory" command, used for making a new directory. To use it, type mkdir, a space, and the name of the new directory you wish to create: mkdir nameofnewdirectory. Again, it is important to add a space between the command and the argument passed to it.
- Note:
mkdir nameofnewdirectorywill create that new directory inside of your current working directory.- If you wish to create a directory outside of your current working directory, you can type mkdir, followed by a space, and then the full path of the new directory.
- For example, if one wanted to create a new directory named 'Homework' inside the Documents directory, one would type:
mkdir /home/student/Documents/Homework
- For example, if one wanted to create a new directory named 'Homework' inside the Documents directory, one would type:
- If you wish to create a directory outside of your current working directory, you can type mkdir, followed by a space, and then the full path of the new directory.
4. cp [copy]
cp is the "copy" command, used for making copies of the content of files and directories. It creates an exact copy of the contents in the files/directories. The syntax for the cp command is: cp [option] source destination where source is the file you want to copy and destination is where you want to copy it to. Copies the files with the same name!
- Note: source and destination can be directories or files
- There are many options that can be used along with the cp command. To read about them all, you can type
man cpon your command line.- Some common ones are:
- -v - Be verbose. Shows the files are they are being copied
- -n - Do not overwrite an existing file
- -i - Causes cp to write a prompt to the standard error output before copying a file that would overwrite an existing file.
- -p - Preserves the modification time, access time, file flags, file mode, user ID, and group ID, as allowed by permissions, in the copy.
- Some common ones are:
- Using cp with two files
cp file1 file2- copies the contents of file1 to the file2.- If file2 doesn't exist, then it will create a file with that name. However, if that file exists, it will overwrite the contents of that file.
- Using cp with two directories
cp -R dir1 dir2- copies the contents and subdirectories in dir1 onto dir2.- It is necessary to use the -R option (causes cp to be recursive and copy any and all subdirectories)
Copying two or more files
cp file1 file2 file3 directory- copies file1, file2, and file3 into directory.- If directory does not exist, it will create one. But if it does exist, it will overwrite it.
5. mv [move files]
mv is the move command, used to move a file or directory to a different location. Unlike cp, which copies a file/directory onto a different location and leaves the original file where it is, mv moves the original to a different location and deletes it from where it previously was.
To syntax to use the mv command is: mv [option] source destination. where source is the file you want to copy and destination is where you want to copy it to.
- Note: You can also use
mvto rename files. The syntax for that is:mv fileyouwanttorename newname- Example:
    $ls
    file1    file2    file3
    $mv file1 newNameForFile1
    $ls
    file2 file3 newNameForFile1
- Example:
- [options] can be found by typing
man mvon the command line.
6. rm [remove]
rm is the remove command, used to remove directories entries. Be careful when using this command because once you remove files, you cannot recover them.
- Syntax:
- To delete a file:
rm filenamewhere filename is the name of the file you want to delete - To delete multiple files:
rm file1 file2 file3 file4 - To delete empty directories:
rm -d directorynameorrmdir directoryname- Emphasis on empty!
- To delete all the files and sub-directories in a directory:
rm -r directorynameMore syntax options can be found by typingman rmon the command line
- To delete a file:
7. history
The history command is used to display the last 500 commands invoked in your account. To use it, simply type history on your command line.
- You can invoke any of the commands shown in the history by typing the ‘!’ followed by the command number
- The command
history –cclears the history buffer
Basic Linux Concepts
Home directory and ~
When you log into a Linux system, you are automatically placed in the home directory. A home directory is a private place for the user to store their files. ~ is the short form for your home directory. It can be used to substitute /home/username in filepaths.
There is a shortcut to immediately go back to your home directory--no matter where your current working directory is: simply type cd or cd ~.
File Paths in Linux
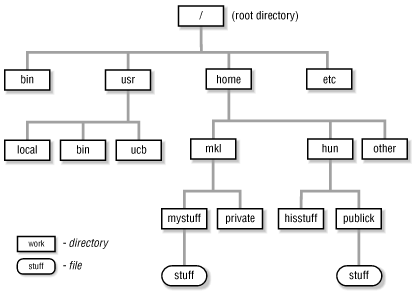
A file path tells you the location of where a file or folder is on your computer. When a file is inside a folder or a folder is inside another folder, a forward slash (/) is used to show this hierarchy. For example, if a file named index.html is in a folder called IS117 which is in your Documents folder, then the file path for that file would be /home/user/Documents/IS117/index.html. The forward slashes symbolize that one item is stored inside of the item before it.
To quickly see the file path of where you currently are in your system, type pwd and it will give you the full path to your position.
File paths can be used to change directories; by typing cd followed by a space and then the filepath.
Example of a file system hierarchy:
Using the tab key to complete file paths
Provided that you correctly type and are using a command, if you begin to type the filepath of the file/directory you intend to use then Linux will autocomplete the rest of the path for you when using the tab key.
For example, using the previous example, if you were to type cd Documents/IS and then pressed the tab key, it would auto complete it to cd Documents/IS117/. If you were to press the tab key again without typing anything, then Linux would try to guess the file you were trying to change into. If the only file inside that folder was index.html, then it would be autocompleted into cd Documents/IS117/index.html.
This method is often used to save time or to ensure the correct spelling of complicatedly-named files.
Using up and down arrow for history
A final shorcut many people use on Linux systems is using the up and down arrows in the keyboard for history. Hitting the up arrow in a terminal will show you the previous entered command in the terminal. If you continue to press the up arrows, it will show you the previous entered command before that, and so on.
This is used to avoid repeating common commands. Also, if you made a mistake when typing a command and wanted to fix it without having to retype everything, then just hit the up arrow until you find the command and then fix the typo.
Vi and Usage
Vi is a text editor that can be used to edit plain texts and programs. Vi runs in three modes:
1. Command Mode - This mode accepts commands, which are usually single letters. For instance, i enters into insert mode and o opens a line below the current one.
2. Execute Mode - This mode manipulate files, like saving files and running outside programs. You enter execute mode by typing a colon (:), and followed by the command you want to use. For example, w saves the file and q quits Vi and returns to the terminal.
3. Insert Mode - This mode is used to enter or edit text. You enter insert mode by typing i or a.
- i - When entering insert mode with the i command, whatever you type will appear to the left of the character the cursor was over.
- a - When entering insert mode with the a command, whatever you type will appeart to the right of the word that the cursor is over.
Creating and/or editing a file using Vi
To create or edit a file using Vi, simply type vi filename where filename is the name of the file you want to create or edit. If a file with that name does not exist, vi will create one in your current working directory. If a file with that name does exist, vi will allow you to edit that.
GitFlow and Git Commands
GitFlow
Gitflow Workflow defines a strict branching model designed around the project release. This provides a robust framework for managing larger projects.
Gitflow is ideally suited for projects that have a scheduled release cycle. This workflow doesn’t add any new concepts or commands beyond what’s required for the Feature Branch Workflow. Instead, it assigns very specific roles to different branches and defines how and when they should interact. In addition to feature branches, it uses individual branches for preparing, maintaining, and recording releases.

Git Terminology
Repository - contains all of the project files (including documentation), and stores each file's revision history. Repositories can have multiple collaborators and can be either public or private.
Clone - is a copy of a repository that lives on your computer instead of on a website's server somewhere, or the act of making that copy. With your clone you can edit the files in your preferred editor and use Git to keep track of your changes without having to be online.
Fork - is a personal copy of another user's repository that lives on your account. Forks allow you to freely make changes to a project without affecting the original.
Branch - is a parallel version of a repository. It is contained within the repository, but does not affect the primary or master branch allowing you to work freely without disrupting the live version. When you've made the changes you want to make, you can merge your branch back into the master branch to publish your changes.
Commit - is a record of what files you have changed since the last time you made a commit. Essentially, you make changes to your repo (for example, adding a file or modifying one) and then tell git to put those files into a commit.
Merge - takes the changes from one branch (in the same repository or from a fork), and applies them into another. This often happens as a pull request (which can be thought of as a request to merge), or via the command line.
Checkout - is the act of switching between different versions of a target entity.
Push - refers to sending your committed changes to a remote repository, such as a repository hosted on GitHub. For instance, if you change something locally, you'd want to then push those changes so that others may access them.
Pull -refers to when you are fetching in changes and merging them. For instance, if someone has edited the remote file you're both working on, you'll want to pull in those changes to your local copy so that it's up to date.
Remote - this is the version of something that is hosted on a server, most likely GitHub. It can be connected to local clones so that changes can be synced.
Status - these checks are external processes, which run for each commit you make in a repository.
Master Branch - is a default branch, as you start making commits, you're given a master branch that points to the last commit you made. Every time you commit, the master branch pointer moves forward automatically.
A list of Git commands
Getting & Creating Repositories
| Command | Description |
|---|---|
git init |
Initialize a local Git repository |
git clone ssh://git@github.com/[username]/[repository-name].git |
Create a local copy of a remote repository |
Status, File Adding, and Commit
| Command | Description |
|---|---|
git status |
Checks status |
git add [file-name.txt] |
Add a file to the staging area |
git add -A |
Add all new and changed files to the staging area |
git commit -m "[commit message]" |
Commit changes |
Branching & Merging
| Command | Description |
|---|---|
git branch |
List branches (the asterisk denotes the current branch) |
git branch -a |
List all branches (local and remote) |
git branch [branch name] |
Create a new branch |
git branch -d [branch name] |
Delete a branch |
git push origin --delete [branch name] |
Delete a remote branch |
git checkout -b [branch name] |
Create a new branch and switch to it |
git checkout -b [branch name] origin/[branch name] |
Clone a remote branch and switch to it |
git checkout [branch name] |
Switch to a branch |
git merge [branch name] |
Merge a branch into the active branch |
git merge [source branch] [target branch] |
Merge a branch into a target branch |
Pushing & Pulling
| Command | Description |
|---|---|
git push origin [branch name] |
Push a branch to your remote repository |
git push -u origin [branch name] |
Push changes to remote repository (and remember the branch) |
git push |
Push changes to remote repository (remembered branch) |
git push origin --delete [branch name] |
Delete a remote branch |
git pull |
Update local repository to the newest commit |
git pull origin [branch name] |
Pull changes from remote repository |
git remote add origin ssh://git@github.com/[username]/[repository-name].git |
Add a remote repository |
git remote set-url origin ssh://git@github.com/[username]/[repository-name].git |
Set a repository's origin branch to SSH |
